shopVOX Pro
Getting started with shopVOX Pro
What is shopVOX? - shopVOX Pro
Getting started with shopVOX - shopVOX Pro
Your Account - shopVOX Pro
Icons and Interface Tour - shopVOX Pro
Inviting Users to Your Team - shopVOX Pro
Setting Roles for your Team - shopVOX Pro
My Profile + SMTP Settings - shopVOX Pro
Import Customers & Contacts from your Accounting software - shopVOX Pro
Adding Vendors - shopVOX Pro
How do I Update Our Billing Info? - shopVOX Pro
Setup Vendor Catalogs - shopVOX Pro
A Guide to Creating Your First Order - shopVOX Pro
Microsoft Outlook - Two Factor Authentication - shopVOX Pro
Customize your account with Add-on Features - shopVOX Pro
Importing and Exporting Customers & Contacts with a spreadsheet - shopVOX Pro
Transactions: New Quote + Quote Approval Process - shopVOX Pro
Database Migration Support for shopVOX - Legacy data - shopVOX Pro
Notifications: Keep your entire team up to date - shopVOX Pro
Color Picker - Saving Colors - shopVOX Pro
Transactions: What are Transactions? - shopVOX Pro
Transactions: New Sales Order - shopVOX Pro
"What's New" Feature: Your Guide to shopVOX Updates - shopVOX Pro
How Do I Cancel My shopVOX Account? - shopVOX Pro
Transactions: New Invoice - shopVOX Pro
How to Create a Quote - shopVOX Pro
shopVOX's History Tracking for Quotes, Sales Orders, Invoices, and Jobs - shopVOX Pro
Save Time with Emailed Document Templates - shopVOX Pro
Webinars in shopVOX Pro: Learn and Grow with Us - shopVOX Pro
shopVOX Express vs. Pro. Explaining the differences in Workflow - shopVOX Pro
Optimizing Quotation Efficiency: Unlocking the Power of Multiple Quantities with shopVOX - shopVOX Pro
Workflows - Quick Overview Express VS Pro - shopVOX Pro
Global Search in shopVOX - shopVOX Pro
Step Board: A Smarter Way to Track Jobs in Your Workflow - shopVOX Pro
Machine Scheduler - shopVOX Pro
How To Add A New Scheduling User In shopVOX - shopVOX Pro
Enhancing Security with Multi-Factor Authentication in shopVOX - shopVOX Pro
Installation Job Board - shopVOX Pro
Setting Up SMS using Twilio - shopVOX Pro
Sales - shopVOX Pro
Managing Customer and Leads
Workflow Stages and Templates Explained - shopVOX Pro
Using a TV for your Job Board - shopVOX Pro
Connecting shopVOX to QuickBooks Desktop: Streamlined Sync for Your Financials - shopVOX Pro
How to Price Color Changes - shopVOX Pro
Customer Alerts & Flags
Sales Commissions - shopVOX Pro
Creating Your Own Custom Job Views - shopVOX Pro
Updating a Workflow in shopVOX: A Complete Guide - shopVOX Pro
Avalara AvaTax - Sales tax setup guide - shopVOX Pro
Merge Customers - shopVOX Pro
Adding new Contacts to Existing Customers - shopVOX Pro
Tracking Partially Fulfilled Apparel Orders in shopVOX
Customer Contacts: Setting Primary and Billing Contacts - shopVOX Pro
How to Price Color Matches - shopVOX Pro
Sales Leads on Business Intelligence Dashboard - shopVOX Pro
How to create Partial Invoices - shopVOX Pro
Multiple Currency Add-On - How it works and setting up - shopVOX Pro
Sales Leads - Sample Pipeline Setup - shopVOX Pro
Sales Order States - shopVOX Pro
Reports - shopVOX Pro
Understanding Quote Statuses in shopVOX - shopVOX Pro
Managing dates on Quotes, Sales Orders, and Invoices - shopVOX Pro
Products & Pricing - shopVOX Pro
Advanced Pricing concepts
Understanding Modifiers in shopVOX: Enhancing Product Pricing Flexibility - shopVOX Pro
Increasing Product Prices by a Percentage in shopVOX - PBase - shopVOX Pro
A Comprehensive Guide to Ternary Operations - shopVOX Pro
Using the Reference Field for Material Selection and Labor Charges - shopVOX Pro
Understanding Pricing Levels - shopVOX Pro
Mastering the Use of *, /, +, -, >, <, >=, <=, % in Ternary Operations - shopVOX Pro
How to Update Pricing in shopVOX: A Comprehensive Guide to Machine Rates, Labor Rates, and Materials - shopVOX Pro
Unlocking Efficiency: Harnessing System Variables and References to Create a Click Charge - shopVOX Pro
Undertanding Sell/Buy Ratio - shopVOX Pro
Product System Formula - with Filter - shopVOX Pro
Product Templates - Custom Formula Logic - shopVOX Pro
Product Template - Add New Defualt Items Configuration Window - shopVOX Pro
Workflow: Machine Time Formula
Custom Logic in shopVOX: Evaluating Multiple Boolean Modifiers - shopVOX Pro
Mastering the Use of &&, ||, and === in Ternary Operations - shopVOX Pro
Products: Utilizing the "Reference" Field to Combine two References into one Click Charge - shopVOX Pro
Golden Products
Golden Product: Flyer - with BOM - shopVOX Pro
Golden Product: Postcard- with BOM - shopVOX Pro
Golden Product: Greeting Cards - with BOM - shopVOX Pro
Golden Product: Calendar - with BOM - shopVOX Pro
Golden Products List by Global Region - shopVOX Pro
Products shopVOX Golden Products - shopVOX Pro
Golden Product: Brochures - with BOM - shopVOX Pro
Golden Product: Print + Copy - with BOM - shopVOX Pro
Golden Product: Business Cards - with BOM - shopVOX Pro
Golden Product: Booklet - with BOM - shopVOX Pro
How to Set Up a Grid-Based Product with Quantity Breakpoints - shopVOX PRO
Golden Product: Door Hangers - with BOM - shopVOX Pro
Adding Your Own Products - shopVOX Pro
How to Publish Products - shopVOX Pro
Product Templates & Formulas Explained - shopVOX Pro
Product Templates - Using System Formulas - shopVOX Pro
Product Templates - Using System Formulas - Adding a Double Sided check box - shopVOX Pro
Product Templates - User Created Formulas - shopVOX Pro
Product Templates - User Created Formulas - Adding a Double side check box - shopVOX Pro
Product Pricing - Round to 2 or 4 Decimal places - shopVOX Pro
Products: Grid Pricing Example - shopVOX Pro
Managing Your Product Catalog - shopVOX Pro
Setting Up Labor Rates in shopVOX: A Simple Guide - shopVOX Pro
Setting Up Machine Rates in shopVOX: A Comprehensive Guide - shopVOX Pro
Materials Management in shopVOX: A Comprehensive Guide - shopVOX Pro
Product Pricing: Material Wastage Calculator - shopVOX Pro
Product Features - Custom Fields - shopVOX Pro
Products - Pricing Type - Formulas - shopVOX Pro
Product Pricing : Cost Plus - shopVOX Pro
Uploading and Sending Proofs for Approval - shopVOX Pro
Product Templates - How to Turn on a Product Template - shopVOX Pro
Guide to Using the Panels UI - shopVOX Pro
How to Price Promotional Products - shopVOX Pro
How to Price Digitizing - shopVOX Pro
How to Price Direct To Garment Printing - shopVOX Pro
Product Template - Add New Drop-Down Menu Configuration Window - shopVOX Pro
Comprehensive Guide to Setting Up a Basic Apparel Product - shopVOX Pro
Pricing Methods: Standard, Product, and Cost Plus Pricing - shopVOX Pro
Custom Product, Template, and Code Modifiers - shopVOX Pro
Accounting and Reporting - shopVOX Pro
QuickBooks Desktop
Connecting Your Sage One Accounting - shopVOX Pro
Transaction Numbers Settings - shopVOX Pro
Add your Payment Gateway - shopVOX Pro (Outside of North America)
Connecting to your Accounting Software - shopVOX Pro
Connecting your XERO account - shopVOX Pro
Connecting Your QuickBooks Online Account - shopVOX Pro
Common Xero Sync Error messages explained - shopVOX Pro
Add your Payment Gateway - shopVOX Pro
shopVOX Pay: Integrated Payment Processor
In application credits and refunds - shopVOX Pay
Integrated SAGE Promo ( promotional catalog ) - shopVOX Pro
Setting Up Your Account - shopVOX Pro
Accounting
Common QB Questions - shopVOX Pro
Charging a Program Fee - shopVOX Pro
Consolidated Program Fee Invoice Setup - shopVOX Pro
Differences between USA QuickBooks Online and Non-USA QuickBooks Online - shopVOX Pro
shopVOX Setup of Tax Codes for Quickbooks Canada Desktop/Online - shopVOX Pro
Five challenges to consider when setting up your Account - shopVOX Pro
How to Filter MFA Email Alerts in Outlook and Gmail - shopVOX Pro
shopVOX Work Flow - The Big Picture - shopVOX Pro
Leveraging External IP Addresses for Security - shopVOX Pro
Hide or Show Quotes & Sales Orders, Ordered Quotes, and Invoiced Quotes and Sales Orders - shopVOX Pro
Add Your Logo and Company Info - shopVOX Pro
How to add Additional Charges to your Quotes, Sales Orders and Invoices - shopVOX Pro
Terms and Conditions - shopVOX Pro
Document's and PDF Settings - shopVOX Pro
Group and Describe Jobs with Tags - shopVOX Pro
How to Change Password - shopVOX Pro
Forms: Customizing Forms - shopVOX Pro
Common Questions About Users - shopVOX Pro
Flagging a user as a "Sales Rep" - shopVOX Pro
Industry Specific Content - shopVOX Pro
Automation & Integrations - shopVOX Pro
Shipping
ShipStation integration - shopVOX Pro
UPS Shipping Integration - shopVOX Pro
Shipping Profiles - setting up Products to automate number of boxes - shopVOX Pro
APIs
What is an API? - shopVOX Pro
How an API Works: A Simple Explanation - shopVOX Pro
Leveraging the Power of shopVOX with API Integration - shopVOX Pro
API Essentials: Understanding the Backbone of Software Communication - shopVOX Pro
Building Your Own Custom Integration with shopVOX APIs - shopVOX Pro
JSON Demystified: The Universal Language of Data Exchange - shopVOX Pro
I'm having an issue with the shopVOX APIs. Who do I contact? - shopVOX Pro
Does shopVOX do custom development? - shopVOX Pro
Does shopVOX integrate with Salesforce? - shopVOX Pro
Setting up Mailchimp Integration - shopVOX Pro
Sales Leads Web Form in shopVOX: Streamline Prospect Capture and Management - shopVOX Pro
Simplify User Authentication with OAuth Integration in shopVOX
Who to Contact for shopVOX API Issues - shopVOX Pro
Setting up Constant Contact Integration in shopVOX
Does shopVOX integrate with Microsoft Project? - shopVOX Pro
API and Webhooks integration feature - shopVOX Pro
How to Activate Your PAX A920 Pro Terminal
shopVOX Go! App - shopVOX Pro
Discovering Your shopVOX API Credentials: A Step-by-Step Guide - shopVOX Pro
Automation - Scheduled Actions - shopVOX Pro
What are some popular advantages when using Zapier? - shopVOX Pro
FAQs - shopVOX Pro
shopVOX specific terms
Common questions
How to increase Database size ? - shopVOX Pro
Opening PDFs directly in your browser - shopVOX Pro
shopVOX User Types - shopVOX Pro
Empowering Project Managers in the Proofing Process: A Guide to Workflow Enhancement - shopVOX Pro
Hex Color file to match PMS color chart - shopVOX Pro
How do I disabled user? - shopVOX Pro
What is the Admin checkbox for when creating a new user? - shopVOX Pro
Invoicing - Enhancing Customer Engagement: Tracking Invoice Views with shopVOX Pro
Where do jobs "fit" in the order process in ShopVOX? - shopVOX Pro
Why can't I print the PDF documents directly, instead of downloading? - shopVOX Pro
How can I send a quote and a proof together in one email to my customer? - shopVOX Pro
Terms and Definitions
Printing Examples - Letterpress Printing
Printing Types Defined
Printing Examples - Digital Printing
Printing Examples - Offset
Errors and Troubleshooting
How to clear history from Chrome browser?
When I convert a quote to a work order, does the name of the order and the line item description carry forward or do I have to rewrite?
How to optimize your browser for shopVOX - shopVOX Pro
Streamlining Proof Attachment to New Sales Orders for Enhanced Efficiency - shopVOX Pro
Setting Up Minimum Order Amounts in shopVOX - shopVOX Pro
What is our IP address for the mail server ? - shopVOX Pro
Custom PDF in shopVOX - shopVOX Pro
Implementation Resources - shopVOX Pro
Foundations & Configurations
Products & Pricing
Implementation - Simple Products Setup
Mastering Product Setup in shopVOX: A Step-by-Step Guide from Basics to Advanced Customization - shopVOX Pro
Lesson 1: Setting Up a Basic Product - shopVOX Pro
Lesson 2: Introducing Dynamic Pricing Based on Square Footage - shopVOX Pro
Lesson 3: Enhancing the Product with Templates and Dropdown Menus - shopVOX Pro
Lesson 4: Adding a Default Item Linked to Modifiers - shopVOX Pro
Lesson 5: Implementing a Double-Sided Boolean Modifier with Conditional Logic - shopVOX Pro
Lesson 6: Replacing a System Formula with a Custom Formula - shopVOX Pro
Lesson 7: Integrating Custom Formula into the Conditional Double-Sided Logic - shopVOX Pro
Lesson 8: Adding an Additional Dropdown Menu - shopVOX Pro
Lesson 9: Creating Custom Fields to Enhance Usability - shopVOX Pro
Lesson 10: Implementing a Rush Charge Option - shopVOX Pro
Summary Conclusion: Lessons 1-10 - shopVOX Pro
Building a Simple Area-Based Rigid Sign Product
Golden products
Greeting Cards with BOM (Bill of Materials) Golden Product
Printed Vehicle Wrap - Golden Product
Envelope Golden Product
Raffle Tickets (Numbered) - Golden Product
Posters Digital Gloss Golden Product
Various Business Card Products - Digital, Linen, Matte,Silk, UV Coated
Heat Transfer Apparel - Golden Product
Print Area Per SqFt - Golden Product
Rigid Sign with Digitally Printed Graphics - Golden Product
Promotional Product - Golden Product
Printed Cut Decals - Golden Product
Shipping - Golden Product
Postcard Digital Golden Product
Flyer with Bill of Materials (BOM) Product
Print Cut Digital Vinyl Graphics - Golden Product
DTG (Direct-to-Garment) Apparel - Golden Product
Ready to Apply (RTA) Vinyl - Golden Product
Brochures with BOM (Bill of Materials) Product Setup and Pricing Review
Notepad Digital Golden Product
Mixed decoration Apparel Golden Product in shopVOX PRO
Design Package - Golden Product
Field Installation - Golden Product
Apparel Simple Charge Products (Color Change, Color Match, Digitizing, and Design Hourly)
Embroidery Apparel - Golden Product
Appointment Cards Digital Golden Product Setup and Pricing
Flyers Digital Golden Product
Color Change Vehicle Wrap Golden Product
Door Hanger Product Setup & Pricing in shopVOX PRO
Retractable Banner Stand - Golden Product
Business Cards - Standard - 3.5 x 2 Golden Product
Postcards with Bill of Materials (BOM) Pricing
Calendar Wall with BOM Golden Product
Print Services - Golden Product
Screen Printing Apparel - Golden Product
Yard Sign - Golden Product
Booklet with BOM Product Setup and Usage Guide
Banner - Golden Product
NCR Forms Digital Golden Product
Business Cards with BOM (Bill of Materials) Product
Wide Format Digitally Printed - Golden Product
Greeting Cards Digital Golden Product
Letterhead Digital Golden Product
Flatbed Digital Print - Golden Product
Print Cut Digital Vehicle Graphics - Golden Product
Rigid Sign with Cut Vinyl Graphics - Golden Product
Print & Copy with Bill of Materials (BOM) Golden product
Brochures - Digital (Gloss) Golden Product
Magnetic Sign - Golden Product
Canvas Print Gallery Wrapped Product
Printing - Custom Golden Product
Golden Product List Overview & Resource Guide
How to Create a Custom Line Item in shopVOX PRO
Quoting and Order Management - shopVOX Pro
Adding/Updating Customers and Contacts - shopVOX Pro
Purchase Orders - How to Add Materials and Products to a Purchase Order in shopVOX PRO for the Inventory Add-on - shopVOX Pro
Stay Organized with Notes, Tasks, and Assets - shopVOX Pro
Roll-Up Line Items to Combine Pricing - shopVOX Pro
Purchasing and Receiving Blank Garments - shopVOX Pro
Creating Your Own Custom Views - shopVOX Pro
How to Issue Refunds and Credit Memos (non shopVOXPay Process) - shopVOX Pro
shopVOX Pro – Quote to Invoice Cheat Sheet - Lifecycle of a transaction
Add Ons - shopVOX Pro
Ecommerce
Ecommerce - Web Store - shopVOX Pro
Ecommerce: Creating Discount Codes - shopVOX Pro
Webstore & Shopping Cart Examples from shopVOX Users - shopVOX Pro
Setting up a Shopping Cart to sell online - Changing the URL - shopVOX Pro
Ecommerce - cPortal - White Label Setup - shopVOX Pro
Ecommerce - cPortal - Adding Products to the Customer Portal shopVOX Pro
Ecommerce - Overview - shopVOX Pro
Empowering Customers with Free cPortals - Enabling Customer Portals in shopVOX
Ecommerce - Shopping Cart - shopVOX Pro
Ecommerce - Apparel Web Store - shopVOX Pro
Inventory
Inventory Module Add-On - Setup and use of Feature - shopVOX Pro
Inventory Module Add-On - Setup Locations - shopVOX Pro
Questions to Consider About the Inventory Module in shopVOX - shopVOX Pro
Inventory Module Add-On - shopVOX Pro
Divisions
Vehicle Wrap
Amazon S3 Storage
Amazon S3 (Simple Storage Service) - Add-On - shopVOX Pro
Amazon S3 Add-On (Simple Storage Service) - Amazon S3 Pricing - shopVOX Pro
Amazon S3 Add-On (Simple Storage Service) - What is it? - shopVOX Pro
Projects in shopVOX: Comprehensive Guide - shopVOX Pro
Service Job Add-On: Streamline Your Workflow with shopVOX's New Service Job Feature - shopVOX Pro
Whats New
2025 Whats New
Thu, 02/27/2025 Update: Down payment can now be a dollar amount. Pro & Express
19/9/25 Update: New Webstore Features
Fri, 01/24/2025 New Notification event: Job step Completed Pro
Wed, 01/29/2025 Highlight: Panel Pricing UI Pro
Sun, 01/19/2025 Freight charges on Purchase Orders Pro
2024 Whats New
Mon, 10/07/2024 Enhancement in Task Pro & Express
Thu, 05/16/2024 Quick Tip: Ability to copy Material/Product Names in Purchase Order Line Items Pro
Tue, 10/08/2024 New feature added: Task templates to prefill repeated Tasks Pro & Express
Tue, 09/24/2024 New update! Connect to your ShipStation account! Pro
Wed, 08/07/2024 Enhancing Dropdown Menus for Material Search Pro
Mon, 04/29/2024 Added a new link directly on the Home screen to navigate Reports
Mon, 07/29/2024 Ability to enter Ft and Inches vs just Inches. Pro
Wed, 06/05/2024 Added a new addition to the Products called 'Published'. Pro & Express
Mon, 04/22/2024 Option to conceal Costs and Markup for apparel items when adding line items
Sun, 10/27/2024 Role-Based Permissions for Editing or Overriding Line Item Costs(Unit Cost) Pro
Wed, 11/27/2024 Apparel images on customer PDF? Show or Don't show! Pro
Fri, 10/04/2024 New Apparel catalog available for US/CAN accounts! Pro & Express
Tue, 05/21/2024 Added New Email Template Tag: {{txn_downpayment}} Pro & Express
Wed, 05/01/2024 Daily Tip - Add shopVOX email id's as contacts!
Tue, 11/26/2024 Track Partially Fulfilled Apparel items on a Sales Order. Pro
Thu, 11/14/2024 We added a new valuable Update in Pricing templates! Pro
Wed, 05/15/2024 Enhanced Notification System: In-app Alert for Proof Uploaded Pro & Express
Wed, 07/24/2024 S3 Storage for your assets. Pro
Tue, 07/02/2024 Implemented the "Board Feet" Formula within the shopVOX Product System. Pro
Sat, 08/10/2024 Australia/New Zealand regional Golden Products have been updated! Pro & Express
Mon, 04/15/2024 Ability to import payments from Xero to shopVOX
Wed, 06/05/2024 Tasks, notes, and assets associated with a quote to sales order to invoice will now be displayed in the Related Assets section. Pro & Express
Thu, 05/09/2024 Dynamic Customer Identification in PDFs
Fri, 05/17/2024 Job Board Overview and Best Practices Pro & Express
Tue, 11/05/2024 2FA - Two Factor Authentication is now active (Optional) Pro & Express
Tue, 10/29/2024 Enhancement to the online proofing feature. Pro & Express
Fri, 07/19/2024 Included in the reporting are two new reports: 1. Quotes with Line Items, and 2. Sales Orders with Line Items. Pro
Thu, 08/08/2024 Microsoft Outlook - Two Factor Authentication Pro & Express
Wed, 05/15/2024 Avalara enabled Stores Changed the way of tax syncing to QBO
Fri, 01/24/2025 Highlighted feature: Quote Review and online approval Pro
Fri, 09/06/2024 Allow Line Item Taxable Override Pro & Express
Fri, 05/31/2024 Added another PDF for Invoice Statements: Aging Summary PDF. Pro & Express
Tue, 08/20/2024 Pro tip: Controlling and protecting access to your customer and transaction data! Pro
Mon, 10/28/2024 New Permission setting! Pro
Fri, 10/18/2024 eCommerce feature update: There have been recent Apparel Webstore improvements Pro
Wed, 10/16/2024 Announcement: Another new US Apparel catalog available! Pro & Express
Thu, 05/30/2024 “Mastering Customer Proof Reviews: Unveiling the Dollar Value Flag” Feel free to use or modify it as needed! 😊📝 Pro & Express
Wed, 11/06/2024 Colors: there is a new way to save colors! Pro & Express
Mon, 09/16/2024 Express & Pro webinar articles Pro & Express
Wed, 08/28/2024 Update: The Purchase Order State will automatically change from Draft to Ordered once the Vendor Order ID is eneterd on the PO. Pro & Express
Thu, 04/25/2024 Added Missing Email PDF types in SO level while sending emails
Thu, 05/02/2024 Quick Tip: Within each user profile, there's a setting to toggle between Full Screen Mode and Fixed Layout.
Fri, 11/08/2024 Download option for AI Template and PDF Template for Vehicle Wrap Products Pro
Tue, 07/02/2024 Introducing the "Total_Area" Formula in ShopVOX! Pro
Fri, 07/26/2024 Update: New option for measurements on a Product. Now you can enter Feet and Inches, instead of just Inches. Pro
Fri, 05/31/2024 Quick Tip: What does the yellow color indicate on a job board? Pro & Express
Mon, 02/10/2025 Ability to change the workflow on a job without deleting the job Pro
Mon, 04/22/2024 Added the JB# in all the Job related reports
Tue, 06/04/2024 Added Fulfilment Type Column on the Order Board. Pro
Thu, 04/25/2024 Ability to handle Spl charges like setup/shipping/Misc/finance charges through SO API
Fri, 02/28/2025 Payment Gateway link: Ability to turn the flag off by default when emailing customer Pro
Thu, 10/17/2024 Enhancements in Materials: Upload the Material Pictures on the Show Overview Only Screen. Pro
Mon, 09/09/2024 Restrict Users to add/change the Discounts on the Line Item of the Transactions Pro
Tue, 04/23/2024 Ability to add "external name" field on the labor rates.
Thu, 04/25/2024 Added functionality to restrict the users with IP addresses
Fri, 07/26/2024 Added Hide Ordered Client Orders flag under Transaction Settings. Pro
Tue, 10/22/2024 Send iCal Email for Service Jobs in Tasks section Pro
Wed, 08/28/2024 Enhancement in New Customer page Pro & Express
Mon, 05/13/2024 Disabled Adding custom line item to Non Admin Users
2026 What's New
- All Categories
- shopVOX Pro
- Implementation Resources - shopVOX Pro
- Products & Pricing
- Golden products
- Rigid Sign with Cut Vinyl Graphics - Golden Product
Rigid Sign with Cut Vinyl Graphics - Golden Product
 Updated
by Aaron Aldrich
Updated
by Aaron Aldrich
Introduction
The Rigid Sign with Cut Vinyl Graphics Golden Product is designed to price rigid substrate signs that use plotter-cut vinyl graphics. It combines substrates, cut vinyl, hardware, double-sided options, and labor into a single estimate, making it a versatile solution for many common sign applications. This article is designed to supplement the video below, with terminology and steps aligned directly to the walkthrough demonstrated.
Related video: Rigid Sign w Cut Vinyl Graphics
Steps
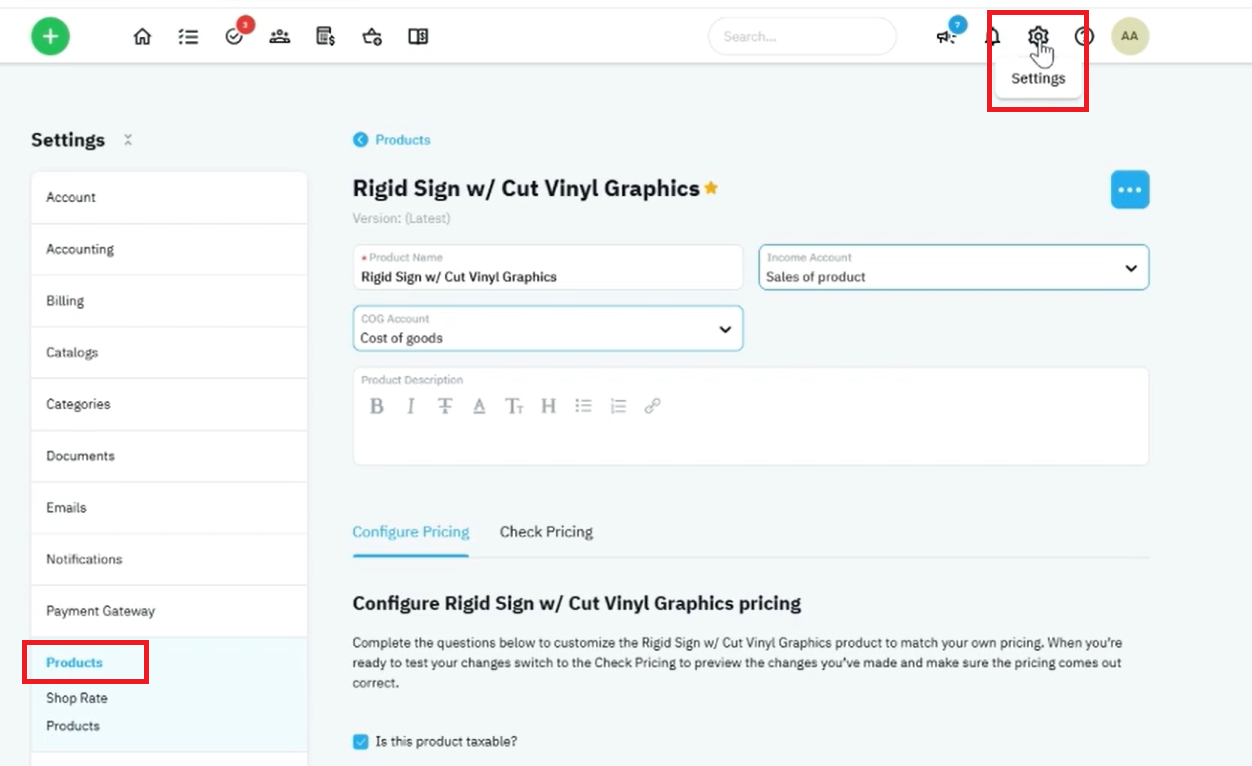
Step 1 – Locate the Rigid Sign with Cut Vinyl Graphics Product
- Navigate to Settings → Products.
- Search for Rigid Sign with Cut Vinyl Graphics.
- Open the product.
- Select Configure Pricing.
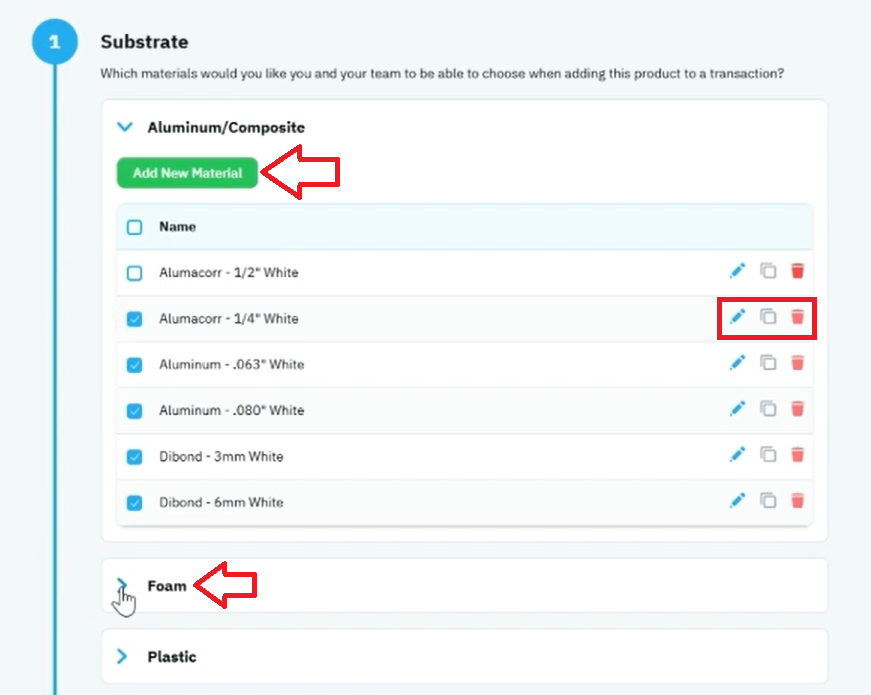
Step 2 – Configure Available Substrates
- Locate the Substrates section.
- Review the preloaded substrate options.
- Edit existing substrate names if needed.
- Duplicate substrates to create variations.
- Add additional substrates for your shop's offerings.
Examples of substrate options include:
- Foam Board
- Acrylic
- Plastic
- Aluminum Composite Material (ACM)
- PVC (Sentra)
You may also create multiple thickness variations by duplicating and editing existing materials.
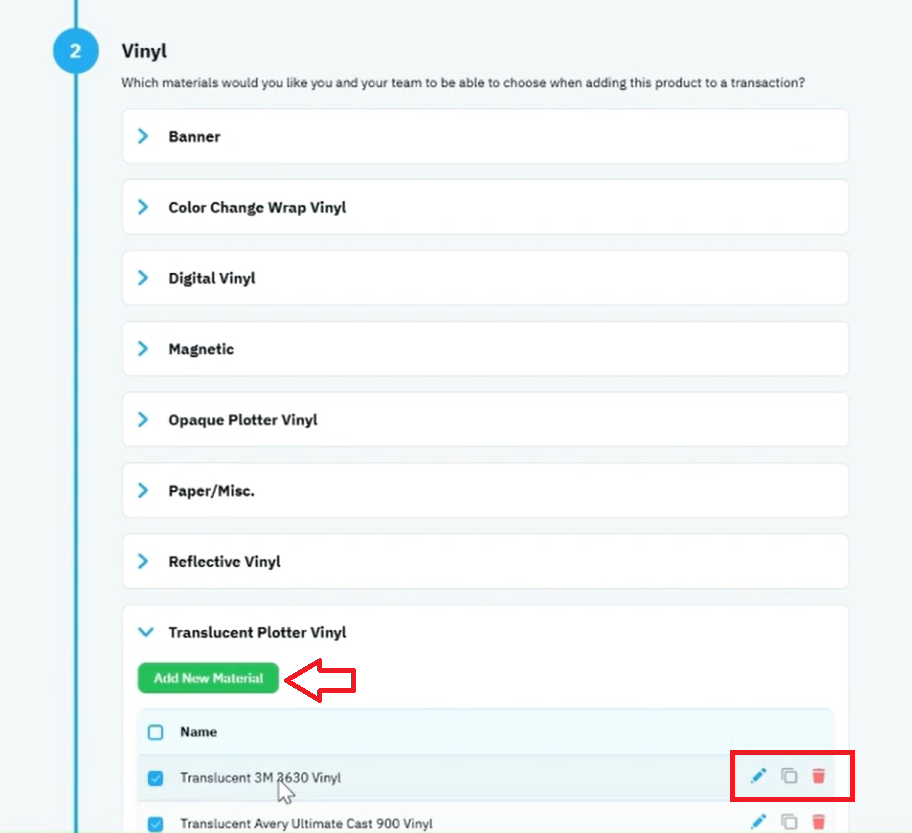
Step 3 – Configure Cut Vinyl Options
- Navigate to the Vinyl section.
- Review the available plotter-cut vinyl materials.
- Select the vinyls you want available when quoting.
- Add additional vinyl types if needed.
- Save any changes.
Examples include:
- Opaque Plotter Vinyl
- Reflective Vinyl
- Translucent Vinyl
This section controls the graphics applied to the rigid substrate.
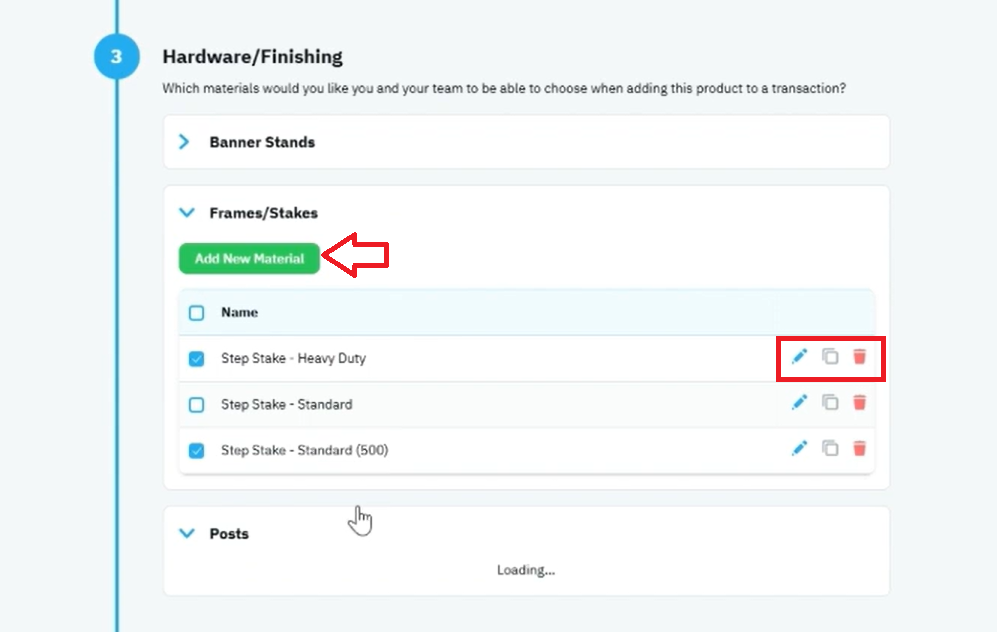
Step 4 – Configure Hardware and Finishing Options
- Locate the Hardware Finishing section.
- Review available hardware options.
- Add new hardware items if required.
- Edit hardware names and pricing as needed.
- Save changes.
Examples include:
- Sign Posts
- Frames
- Mounting Hardware
- Brackets
When selling multiple posts, create hardware items as complete sets (for example, a set of two posts or a set of four posts).
Step 5 – Configure Double-Sided and Labor Pricing
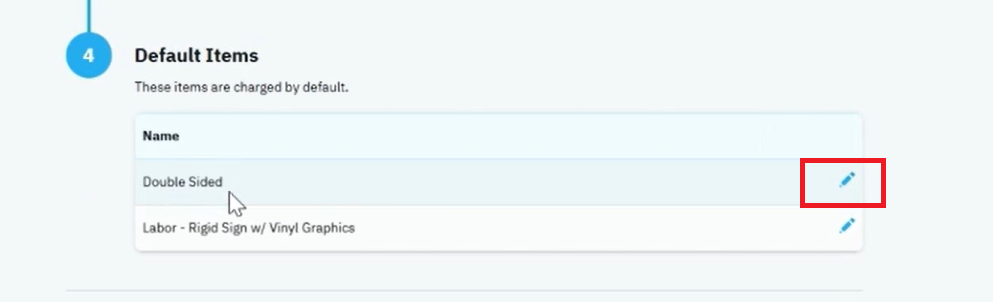
- Review the Default Items section.
- Verify the Double-Sided Charge percentage.
- Adjust the percentage if your shop uses a different pricing model.
- Review the production labor rate.
- Update labor pricing as needed.
By default, the second side is calculated at 50% of the front-side graphics cost.
The labor item is connected to the labor adjustment slider used during estimating.
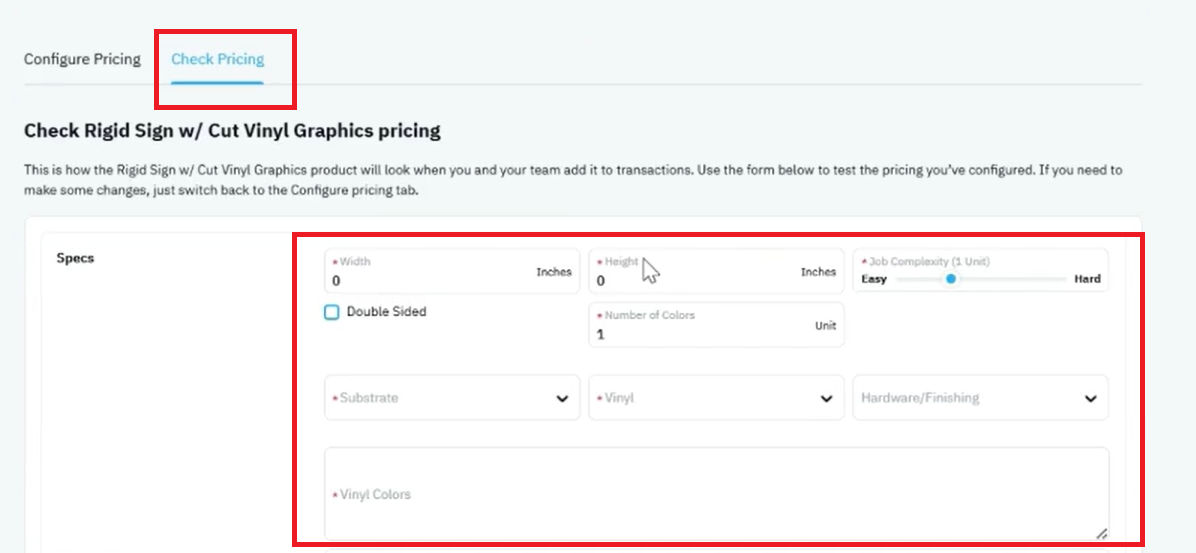
Step 6 – Open Check Pricing
- Select the Check Pricing tab.
- Enter the sign dimensions.
- Select the appropriate substrate.
- Choose the cut vinyl material.
- Select any required hardware options.
- Adjust labor settings if necessary.
The system will automatically calculate pricing based on the selected materials and options.
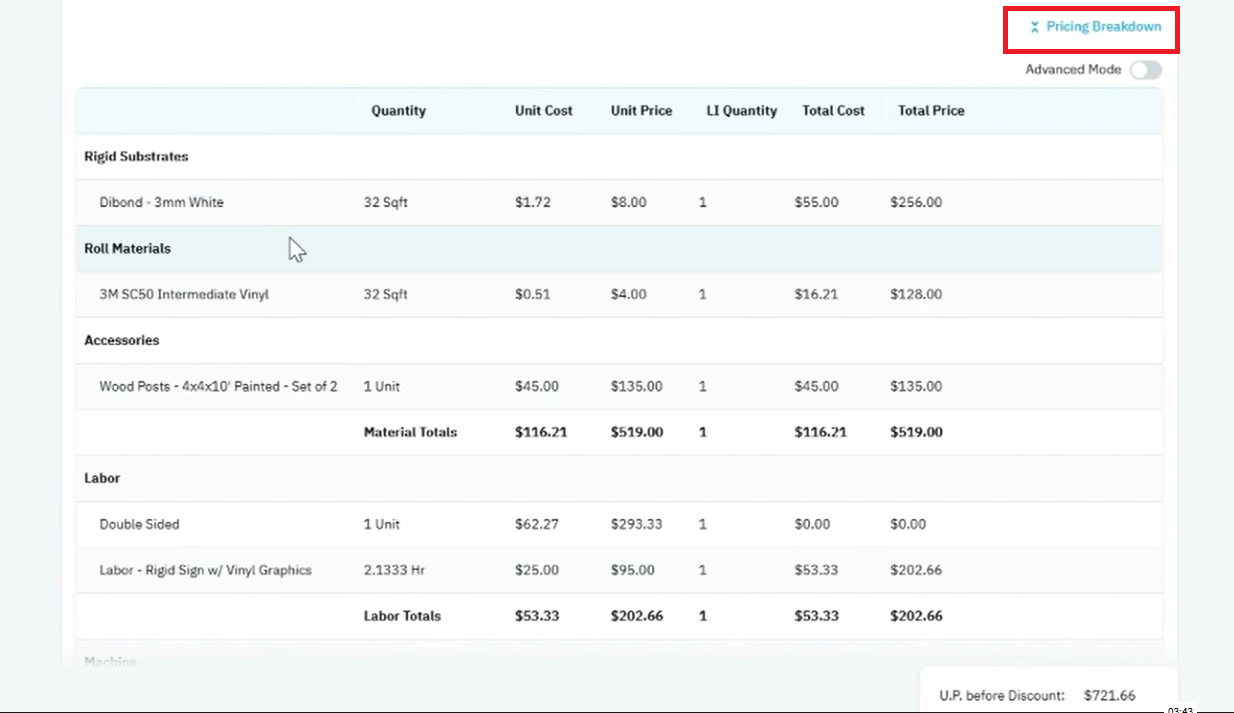
Step 7 – Review the Price Breakdown
- Click Price Breakdown.
- Review the bill of materials.
- Verify substrate pricing.
- Confirm vinyl material calculations.
- Check hardware pricing.
- Review labor and double-sided charges.
- Validate the final selling price.
The breakdown displays:
- Material Costs
- Material Pricing
- Hardware Charges
- Labor Charges
- Double-Sided Charges
- Total Selling Price
Notes & Tips
🔹 Tip: This product is often considered the “Swiss Army Knife” of substrate-based sign products because it can support a wide variety of rigid sign applications.
🔹 Tip: Duplicate existing substrates to quickly create thickness variations without rebuilding material settings from scratch.
🔹 Tip: Create hardware as complete sets when selling multiple sign posts to simplify quoting and improve pricing accuracy.
🔹 Tip: Rename generic materials to match supplier terminology used by your shop.
⚠️ Warning: This product is intended for cut vinyl graphics. For digitally printed graphics, consider using a printed sign product instead.
⚠️ Warning: Hardware pricing should reflect complete installation sets when multiple components are sold together.
⚠️ Warning: Verify double-sided pricing percentages align with your production and material costs.
⚠️ Warning: Changes made to substrate dimensions, material pricing, or labor rates will directly impact quote calculations.
Outcome / Summary
After following these steps, you should be able to:
· Configure rigid sign substrates and cut vinyl materials.
· Maintain hardware and finishing options for sign installations.
· Configure double-sided pricing logic.
· Manage labor rates for production and assembly.
· Generate accurate estimates for rigid signs with cut vinyl graphics.
· Review detailed material, labor, hardware, and pricing calculations using the Price Breakdown.

