shopVOX Pro
Getting started with shopVOX Pro
What is shopVOX? - shopVOX Pro
Getting started with shopVOX - shopVOX Pro
Your Account - shopVOX Pro
Icons and Interface Tour - shopVOX Pro
Inviting Users to Your Team - shopVOX Pro
Setting Roles for your Team - shopVOX Pro
My Profile + SMTP Settings - shopVOX Pro
Import Customers & Contacts from your Accounting software - shopVOX Pro
Adding Vendors - shopVOX Pro
How do I Update Our Billing Info? - shopVOX Pro
Setup Vendor Catalogs - shopVOX Pro
A Guide to Creating Your First Order - shopVOX Pro
Microsoft Outlook - Two Factor Authentication - shopVOX Pro
Customize your account with Add-on Features - shopVOX Pro
Importing and Exporting Customers & Contacts with a spreadsheet - shopVOX Pro
Transactions: New Quote + Quote Approval Process - shopVOX Pro
Database Migration Support for shopVOX - Legacy data - shopVOX Pro
Notifications: Keep your entire team up to date - shopVOX Pro
Color Picker - Saving Colors - shopVOX Pro
Transactions: What are Transactions? - shopVOX Pro
Transactions: New Sales Order - shopVOX Pro
"What's New" Feature: Your Guide to shopVOX Updates - shopVOX Pro
How Do I Cancel My shopVOX Account? - shopVOX Pro
Transactions: New Invoice - shopVOX Pro
How to Create a Quote - shopVOX Pro
shopVOX's History Tracking for Quotes, Sales Orders, Invoices, and Jobs - shopVOX Pro
Save Time with Emailed Document Templates - shopVOX Pro
Webinars in shopVOX Pro: Learn and Grow with Us - shopVOX Pro
shopVOX Express vs. Pro. Explaining the differences in Workflow - shopVOX Pro
Optimizing Quotation Efficiency: Unlocking the Power of Multiple Quantities with shopVOX - shopVOX Pro
Workflows - Quick Overview Express VS Pro - shopVOX Pro
Global Search in shopVOX - shopVOX Pro
Step Board: A Smarter Way to Track Jobs in Your Workflow - shopVOX Pro
Machine Scheduler - shopVOX Pro
How To Add A New Scheduling User In shopVOX - shopVOX Pro
Enhancing Security with Multi-Factor Authentication in shopVOX - shopVOX Pro
Installation Job Board - shopVOX Pro
Setting Up SMS using Twilio - shopVOX Pro
Sales - shopVOX Pro
Managing Customer and Leads
Workflow Stages and Templates Explained - shopVOX Pro
Using a TV for your Job Board - shopVOX Pro
Connecting shopVOX to QuickBooks Desktop: Streamlined Sync for Your Financials - shopVOX Pro
How to Price Color Changes - shopVOX Pro
Customer Alerts & Flags
Sales Commissions - shopVOX Pro
Creating Your Own Custom Job Views - shopVOX Pro
Updating a Workflow in shopVOX: A Complete Guide - shopVOX Pro
Avalara AvaTax - Sales tax setup guide - shopVOX Pro
Merge Customers - shopVOX Pro
Adding new Contacts to Existing Customers - shopVOX Pro
Tracking Partially Fulfilled Apparel Orders in shopVOX
Customer Contacts: Setting Primary and Billing Contacts - shopVOX Pro
How to Price Color Matches - shopVOX Pro
Sales Leads on Business Intelligence Dashboard - shopVOX Pro
How to create Partial Invoices - shopVOX Pro
Multiple Currency Add-On - How it works and setting up - shopVOX Pro
Sales Leads - Sample Pipeline Setup - shopVOX Pro
Sales Order States - shopVOX Pro
Reports - shopVOX Pro
Understanding Quote Statuses in shopVOX - shopVOX Pro
Managing dates on Quotes, Sales Orders, and Invoices - shopVOX Pro
Products & Pricing - shopVOX Pro
Advanced Pricing concepts
Understanding Modifiers in shopVOX: Enhancing Product Pricing Flexibility - shopVOX Pro
Increasing Product Prices by a Percentage in shopVOX - PBase - shopVOX Pro
A Comprehensive Guide to Ternary Operations - shopVOX Pro
Using the Reference Field for Material Selection and Labor Charges - shopVOX Pro
Understanding Pricing Levels - shopVOX Pro
Mastering the Use of *, /, +, -, >, <, >=, <=, % in Ternary Operations - shopVOX Pro
How to Update Pricing in shopVOX: A Comprehensive Guide to Machine Rates, Labor Rates, and Materials - shopVOX Pro
Unlocking Efficiency: Harnessing System Variables and References to Create a Click Charge - shopVOX Pro
Undertanding Sell/Buy Ratio - shopVOX Pro
Product System Formula - with Filter - shopVOX Pro
Product Templates - Custom Formula Logic - shopVOX Pro
Product Template - Add New Defualt Items Configuration Window - shopVOX Pro
Workflow: Machine Time Formula
Custom Logic in shopVOX: Evaluating Multiple Boolean Modifiers - shopVOX Pro
Mastering the Use of &&, ||, and === in Ternary Operations - shopVOX Pro
Products: Utilizing the "Reference" Field to Combine two References into one Click Charge - shopVOX Pro
Golden Products
Golden Product: Flyer - with BOM - shopVOX Pro
Golden Product: Postcard- with BOM - shopVOX Pro
Golden Product: Greeting Cards - with BOM - shopVOX Pro
Golden Product: Calendar - with BOM - shopVOX Pro
Golden Products List by Global Region - shopVOX Pro
Products shopVOX Golden Products - shopVOX Pro
Golden Product: Brochures - with BOM - shopVOX Pro
Golden Product: Print + Copy - with BOM - shopVOX Pro
Golden Product: Business Cards - with BOM - shopVOX Pro
Golden Product: Booklet - with BOM - shopVOX Pro
How to Set Up a Grid-Based Product with Quantity Breakpoints - shopVOX PRO
Golden Product: Door Hangers - with BOM - shopVOX Pro
Adding Your Own Products - shopVOX Pro
How to Publish Products - shopVOX Pro
Product Templates & Formulas Explained - shopVOX Pro
Product Templates - Using System Formulas - shopVOX Pro
Product Templates - Using System Formulas - Adding a Double Sided check box - shopVOX Pro
Product Templates - User Created Formulas - shopVOX Pro
Product Templates - User Created Formulas - Adding a Double side check box - shopVOX Pro
Product Pricing - Round to 2 or 4 Decimal places - shopVOX Pro
Products: Grid Pricing Example - shopVOX Pro
Managing Your Product Catalog - shopVOX Pro
Setting Up Labor Rates in shopVOX: A Simple Guide - shopVOX Pro
Setting Up Machine Rates in shopVOX: A Comprehensive Guide - shopVOX Pro
Materials Management in shopVOX: A Comprehensive Guide - shopVOX Pro
Product Pricing: Material Wastage Calculator - shopVOX Pro
Product Features - Custom Fields - shopVOX Pro
Products - Pricing Type - Formulas - shopVOX Pro
Product Pricing : Cost Plus - shopVOX Pro
Uploading and Sending Proofs for Approval - shopVOX Pro
Product Templates - How to Turn on a Product Template - shopVOX Pro
Guide to Using the Panels UI - shopVOX Pro
How to Price Promotional Products - shopVOX Pro
How to Price Digitizing - shopVOX Pro
How to Price Direct To Garment Printing - shopVOX Pro
Product Template - Add New Drop-Down Menu Configuration Window - shopVOX Pro
Comprehensive Guide to Setting Up a Basic Apparel Product - shopVOX Pro
Pricing Methods: Standard, Product, and Cost Plus Pricing - shopVOX Pro
Custom Product, Template, and Code Modifiers - shopVOX Pro
Accounting and Reporting - shopVOX Pro
QuickBooks Desktop
Connecting Your Sage One Accounting - shopVOX Pro
Transaction Numbers Settings - shopVOX Pro
Add your Payment Gateway - shopVOX Pro (Outside of North America)
Connecting to your Accounting Software - shopVOX Pro
Connecting your XERO account - shopVOX Pro
Connecting Your QuickBooks Online Account - shopVOX Pro
Common Xero Sync Error messages explained - shopVOX Pro
Add your Payment Gateway - shopVOX Pro
shopVOX Pay: Integrated Payment Processor
In application credits and refunds - shopVOX Pay
Integrated SAGE Promo ( promotional catalog ) - shopVOX Pro
Setting Up Your Account - shopVOX Pro
Accounting
Common QB Questions - shopVOX Pro
Charging a Program Fee - shopVOX Pro
Consolidated Program Fee Invoice Setup - shopVOX Pro
Differences between USA QuickBooks Online and Non-USA QuickBooks Online - shopVOX Pro
shopVOX Setup of Tax Codes for Quickbooks Canada Desktop/Online - shopVOX Pro
Five challenges to consider when setting up your Account - shopVOX Pro
How to Filter MFA Email Alerts in Outlook and Gmail - shopVOX Pro
shopVOX Work Flow - The Big Picture - shopVOX Pro
Leveraging External IP Addresses for Security - shopVOX Pro
Hide or Show Quotes & Sales Orders, Ordered Quotes, and Invoiced Quotes and Sales Orders - shopVOX Pro
Add Your Logo and Company Info - shopVOX Pro
How to add Additional Charges to your Quotes, Sales Orders and Invoices - shopVOX Pro
Terms and Conditions - shopVOX Pro
Document's and PDF Settings - shopVOX Pro
Group and Describe Jobs with Tags - shopVOX Pro
How to Change Password - shopVOX Pro
Forms: Customizing Forms - shopVOX Pro
Common Questions About Users - shopVOX Pro
Flagging a user as a "Sales Rep" - shopVOX Pro
Industry Specific Content - shopVOX Pro
Automation & Integrations - shopVOX Pro
Shipping
ShipStation integration - shopVOX Pro
UPS Shipping Integration - shopVOX Pro
Shipping Profiles - setting up Products to automate number of boxes - shopVOX Pro
APIs
What is an API? - shopVOX Pro
How an API Works: A Simple Explanation - shopVOX Pro
Leveraging the Power of shopVOX with API Integration - shopVOX Pro
API Essentials: Understanding the Backbone of Software Communication - shopVOX Pro
Building Your Own Custom Integration with shopVOX APIs - shopVOX Pro
JSON Demystified: The Universal Language of Data Exchange - shopVOX Pro
I'm having an issue with the shopVOX APIs. Who do I contact? - shopVOX Pro
Does shopVOX do custom development? - shopVOX Pro
Does shopVOX integrate with Salesforce? - shopVOX Pro
Setting up Mailchimp Integration - shopVOX Pro
Sales Leads Web Form in shopVOX: Streamline Prospect Capture and Management - shopVOX Pro
Simplify User Authentication with OAuth Integration in shopVOX
Who to Contact for shopVOX API Issues - shopVOX Pro
Setting up Constant Contact Integration in shopVOX
Does shopVOX integrate with Microsoft Project? - shopVOX Pro
API and Webhooks integration feature - shopVOX Pro
How to Activate Your PAX A920 Pro Terminal
shopVOX Go! App - shopVOX Pro
Discovering Your shopVOX API Credentials: A Step-by-Step Guide - shopVOX Pro
Automation - Scheduled Actions - shopVOX Pro
What are some popular advantages when using Zapier? - shopVOX Pro
FAQs - shopVOX Pro
shopVOX specific terms
Common questions
How to increase Database size ? - shopVOX Pro
Opening PDFs directly in your browser - shopVOX Pro
shopVOX User Types - shopVOX Pro
Empowering Project Managers in the Proofing Process: A Guide to Workflow Enhancement - shopVOX Pro
Hex Color file to match PMS color chart - shopVOX Pro
How do I disabled user? - shopVOX Pro
What is the Admin checkbox for when creating a new user? - shopVOX Pro
Invoicing - Enhancing Customer Engagement: Tracking Invoice Views with shopVOX Pro
Where do jobs "fit" in the order process in ShopVOX? - shopVOX Pro
Why can't I print the PDF documents directly, instead of downloading? - shopVOX Pro
How can I send a quote and a proof together in one email to my customer? - shopVOX Pro
Terms and Definitions
Printing Examples - Letterpress Printing
Printing Types Defined
Printing Examples - Digital Printing
Printing Examples - Offset
Errors and Troubleshooting
How to clear history from Chrome browser?
When I convert a quote to a work order, does the name of the order and the line item description carry forward or do I have to rewrite?
How to optimize your browser for shopVOX - shopVOX Pro
Streamlining Proof Attachment to New Sales Orders for Enhanced Efficiency - shopVOX Pro
Setting Up Minimum Order Amounts in shopVOX - shopVOX Pro
What is our IP address for the mail server ? - shopVOX Pro
Custom PDF in shopVOX - shopVOX Pro
Implementation Resources - shopVOX Pro
Foundations & Configurations
Products & Pricing
Implementation - Simple Products Setup
Mastering Product Setup in shopVOX: A Step-by-Step Guide from Basics to Advanced Customization - shopVOX Pro
Lesson 1: Setting Up a Basic Product - shopVOX Pro
Lesson 2: Introducing Dynamic Pricing Based on Square Footage - shopVOX Pro
Lesson 3: Enhancing the Product with Templates and Dropdown Menus - shopVOX Pro
Lesson 4: Adding a Default Item Linked to Modifiers - shopVOX Pro
Lesson 5: Implementing a Double-Sided Boolean Modifier with Conditional Logic - shopVOX Pro
Lesson 6: Replacing a System Formula with a Custom Formula - shopVOX Pro
Lesson 7: Integrating Custom Formula into the Conditional Double-Sided Logic - shopVOX Pro
Lesson 8: Adding an Additional Dropdown Menu - shopVOX Pro
Lesson 9: Creating Custom Fields to Enhance Usability - shopVOX Pro
Lesson 10: Implementing a Rush Charge Option - shopVOX Pro
Summary Conclusion: Lessons 1-10 - shopVOX Pro
Building a Simple Area-Based Rigid Sign Product
Golden products
Greeting Cards with BOM (Bill of Materials) Golden Product
Printed Vehicle Wrap - Golden Product
Envelope Golden Product
Raffle Tickets (Numbered) - Golden Product
Posters Digital Gloss Golden Product
Various Business Card Products - Digital, Linen, Matte,Silk, UV Coated
Heat Transfer Apparel - Golden Product
Print Area Per SqFt - Golden Product
Rigid Sign with Digitally Printed Graphics - Golden Product
Promotional Product - Golden Product
Printed Cut Decals - Golden Product
Shipping - Golden Product
Postcard Digital Golden Product
Flyer with Bill of Materials (BOM) Product
Print Cut Digital Vinyl Graphics - Golden Product
DTG (Direct-to-Garment) Apparel - Golden Product
Ready to Apply (RTA) Vinyl - Golden Product
Brochures with BOM (Bill of Materials) Product Setup and Pricing Review
Notepad Digital Golden Product
Mixed decoration Apparel Golden Product in shopVOX PRO
Design Package - Golden Product
Field Installation - Golden Product
Apparel Simple Charge Products (Color Change, Color Match, Digitizing, and Design Hourly)
Embroidery Apparel - Golden Product
Appointment Cards Digital Golden Product Setup and Pricing
Flyers Digital Golden Product
Color Change Vehicle Wrap Golden Product
Door Hanger Product Setup & Pricing in shopVOX PRO
Retractable Banner Stand - Golden Product
Business Cards - Standard - 3.5 x 2 Golden Product
Postcards with Bill of Materials (BOM) Pricing
Calendar Wall with BOM Golden Product
Print Services - Golden Product
Screen Printing Apparel - Golden Product
Yard Sign - Golden Product
Booklet with BOM Product Setup and Usage Guide
Banner - Golden Product
NCR Forms Digital Golden Product
Business Cards with BOM (Bill of Materials) Product
Wide Format Digitally Printed - Golden Product
Greeting Cards Digital Golden Product
Letterhead Digital Golden Product
Flatbed Digital Print - Golden Product
Print Cut Digital Vehicle Graphics - Golden Product
Rigid Sign with Cut Vinyl Graphics - Golden Product
Print & Copy with Bill of Materials (BOM) Golden product
Brochures - Digital (Gloss) Golden Product
Magnetic Sign - Golden Product
Canvas Print Gallery Wrapped Product
Printing - Custom Golden Product
Golden Product List Overview & Resource Guide
Quoting and Order Management - shopVOX Pro
Adding/Updating Customers and Contacts - shopVOX Pro
Purchase Orders - How to Add Materials and Products to a Purchase Order in shopVOX PRO for the Inventory Add-on - shopVOX Pro
Stay Organized with Notes, Tasks, and Assets - shopVOX Pro
Roll-Up Line Items to Combine Pricing - shopVOX Pro
Purchasing and Receiving Blank Garments - shopVOX Pro
Creating Your Own Custom Views - shopVOX Pro
How to Issue Refunds and Credit Memos (non shopVOXPay Process) - shopVOX Pro
shopVOX Pro – Quote to Invoice Cheat Sheet - Lifecycle of a transaction
Add Ons - shopVOX Pro
Ecommerce
Ecommerce - Web Store - shopVOX Pro
Ecommerce: Creating Discount Codes - shopVOX Pro
Webstore & Shopping Cart Examples from shopVOX Users - shopVOX Pro
Setting up a Shopping Cart to sell online - Changing the URL - shopVOX Pro
Ecommerce - cPortal - White Label Setup - shopVOX Pro
Ecommerce - cPortal - Adding Products to the Customer Portal shopVOX Pro
Ecommerce - Overview - shopVOX Pro
Empowering Customers with Free cPortals - Enabling Customer Portals in shopVOX
Ecommerce - Shopping Cart - shopVOX Pro
Ecommerce - Apparel Web Store - shopVOX Pro
Inventory
Inventory Module Add-On - Setup and use of Feature - shopVOX Pro
Inventory Module Add-On - Setup Locations - shopVOX Pro
Questions to Consider About the Inventory Module in shopVOX - shopVOX Pro
Inventory Module Add-On - shopVOX Pro
Divisions
Vehicle Wrap
Amazon S3 Storage
Amazon S3 (Simple Storage Service) - Add-On - shopVOX Pro
Amazon S3 Add-On (Simple Storage Service) - Amazon S3 Pricing - shopVOX Pro
Amazon S3 Add-On (Simple Storage Service) - What is it? - shopVOX Pro
Projects in shopVOX: Comprehensive Guide - shopVOX Pro
Service Job Add-On: Streamline Your Workflow with shopVOX's New Service Job Feature - shopVOX Pro
Whats New
2025 Whats New
Thu, 02/27/2025 Update: Down payment can now be a dollar amount. Pro & Express
19/9/25 Update: New Webstore Features
Fri, 01/24/2025 New Notification event: Job step Completed Pro
Wed, 01/29/2025 Highlight: Panel Pricing UI Pro
Sun, 01/19/2025 Freight charges on Purchase Orders Pro
2024 Whats New
Mon, 10/07/2024 Enhancement in Task Pro & Express
Thu, 05/16/2024 Quick Tip: Ability to copy Material/Product Names in Purchase Order Line Items Pro
Tue, 10/08/2024 New feature added: Task templates to prefill repeated Tasks Pro & Express
Tue, 09/24/2024 New update! Connect to your ShipStation account! Pro
Wed, 08/07/2024 Enhancing Dropdown Menus for Material Search Pro
Mon, 04/29/2024 Added a new link directly on the Home screen to navigate Reports
Mon, 07/29/2024 Ability to enter Ft and Inches vs just Inches. Pro
Wed, 06/05/2024 Added a new addition to the Products called 'Published'. Pro & Express
Mon, 04/22/2024 Option to conceal Costs and Markup for apparel items when adding line items
Sun, 10/27/2024 Role-Based Permissions for Editing or Overriding Line Item Costs(Unit Cost) Pro
Wed, 11/27/2024 Apparel images on customer PDF? Show or Don't show! Pro
Fri, 10/04/2024 New Apparel catalog available for US/CAN accounts! Pro & Express
Tue, 05/21/2024 Added New Email Template Tag: {{txn_downpayment}} Pro & Express
Wed, 05/01/2024 Daily Tip - Add shopVOX email id's as contacts!
Tue, 11/26/2024 Track Partially Fulfilled Apparel items on a Sales Order. Pro
Thu, 11/14/2024 We added a new valuable Update in Pricing templates! Pro
Wed, 05/15/2024 Enhanced Notification System: In-app Alert for Proof Uploaded Pro & Express
Wed, 07/24/2024 S3 Storage for your assets. Pro
Tue, 07/02/2024 Implemented the "Board Feet" Formula within the shopVOX Product System. Pro
Sat, 08/10/2024 Australia/New Zealand regional Golden Products have been updated! Pro & Express
Mon, 04/15/2024 Ability to import payments from Xero to shopVOX
Wed, 06/05/2024 Tasks, notes, and assets associated with a quote to sales order to invoice will now be displayed in the Related Assets section. Pro & Express
Thu, 05/09/2024 Dynamic Customer Identification in PDFs
Fri, 05/17/2024 Job Board Overview and Best Practices Pro & Express
Tue, 11/05/2024 2FA - Two Factor Authentication is now active (Optional) Pro & Express
Tue, 10/29/2024 Enhancement to the online proofing feature. Pro & Express
Fri, 07/19/2024 Included in the reporting are two new reports: 1. Quotes with Line Items, and 2. Sales Orders with Line Items. Pro
Thu, 08/08/2024 Microsoft Outlook - Two Factor Authentication Pro & Express
Wed, 05/15/2024 Avalara enabled Stores Changed the way of tax syncing to QBO
Fri, 01/24/2025 Highlighted feature: Quote Review and online approval Pro
Fri, 09/06/2024 Allow Line Item Taxable Override Pro & Express
Fri, 05/31/2024 Added another PDF for Invoice Statements: Aging Summary PDF. Pro & Express
Tue, 08/20/2024 Pro tip: Controlling and protecting access to your customer and transaction data! Pro
Mon, 10/28/2024 New Permission setting! Pro
Fri, 10/18/2024 eCommerce feature update: There have been recent Apparel Webstore improvements Pro
Wed, 10/16/2024 Announcement: Another new US Apparel catalog available! Pro & Express
Thu, 05/30/2024 “Mastering Customer Proof Reviews: Unveiling the Dollar Value Flag” Feel free to use or modify it as needed! 😊📝 Pro & Express
Wed, 11/06/2024 Colors: there is a new way to save colors! Pro & Express
Mon, 09/16/2024 Express & Pro webinar articles Pro & Express
Wed, 08/28/2024 Update: The Purchase Order State will automatically change from Draft to Ordered once the Vendor Order ID is eneterd on the PO. Pro & Express
Thu, 04/25/2024 Added Missing Email PDF types in SO level while sending emails
Thu, 05/02/2024 Quick Tip: Within each user profile, there's a setting to toggle between Full Screen Mode and Fixed Layout.
Fri, 11/08/2024 Download option for AI Template and PDF Template for Vehicle Wrap Products Pro
Tue, 07/02/2024 Introducing the "Total_Area" Formula in ShopVOX! Pro
Fri, 07/26/2024 Update: New option for measurements on a Product. Now you can enter Feet and Inches, instead of just Inches. Pro
Fri, 05/31/2024 Quick Tip: What does the yellow color indicate on a job board? Pro & Express
Mon, 02/10/2025 Ability to change the workflow on a job without deleting the job Pro
Mon, 04/22/2024 Added the JB# in all the Job related reports
Tue, 06/04/2024 Added Fulfilment Type Column on the Order Board. Pro
Thu, 04/25/2024 Ability to handle Spl charges like setup/shipping/Misc/finance charges through SO API
Fri, 02/28/2025 Payment Gateway link: Ability to turn the flag off by default when emailing customer Pro
Thu, 10/17/2024 Enhancements in Materials: Upload the Material Pictures on the Show Overview Only Screen. Pro
Mon, 09/09/2024 Restrict Users to add/change the Discounts on the Line Item of the Transactions Pro
Tue, 04/23/2024 Ability to add "external name" field on the labor rates.
Thu, 04/25/2024 Added functionality to restrict the users with IP addresses
Fri, 07/26/2024 Added Hide Ordered Client Orders flag under Transaction Settings. Pro
Tue, 10/22/2024 Send iCal Email for Service Jobs in Tasks section Pro
Wed, 08/28/2024 Enhancement in New Customer page Pro & Express
Mon, 05/13/2024 Disabled Adding custom line item to Non Admin Users
2026 What's New
- All Categories
- shopVOX Pro
- Implementation Resources - shopVOX Pro
- Products & Pricing
- Golden products
- Printing - Custom Golden Product
Printing - Custom Golden Product
 Updated
by Aaron Aldrich
Updated
by Aaron Aldrich
Introduction
The Printing Custom Golden Product is designed for custom print jobs that require flexible pricing beyond standard Bill of Materials (BOM) calculations. Unlike BOM-based products, this product relies on user-entered production information such as paper selection, quantity-up placement, printing methods, and finishing options to calculate pricing. This article is designed to supplement the video below, with terminology and steps aligned directly to the walkthrough demonstrated.
Related video: Printing - Custom
Steps
Step 1 – Open the Printing Custom Product
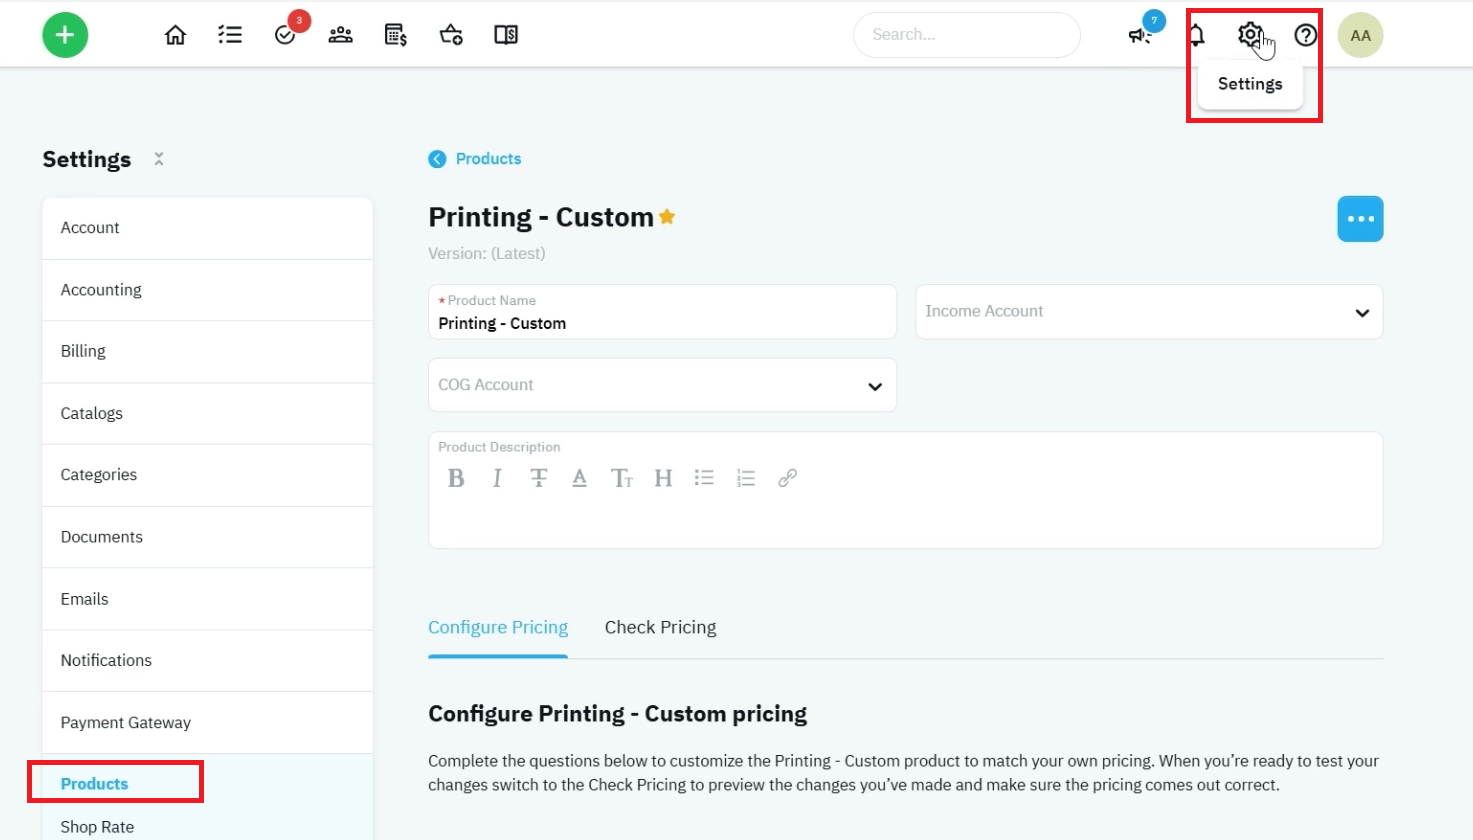
- Navigate to Settings → Products.
- Select Printing Custom from the product list.
- Open the product and access the Configure Pricing page.
This product is intended for print jobs that require manual production planning and does not automatically calculate sheet layouts like a traditional BOM product.
Step 2 – Configure Paper Options
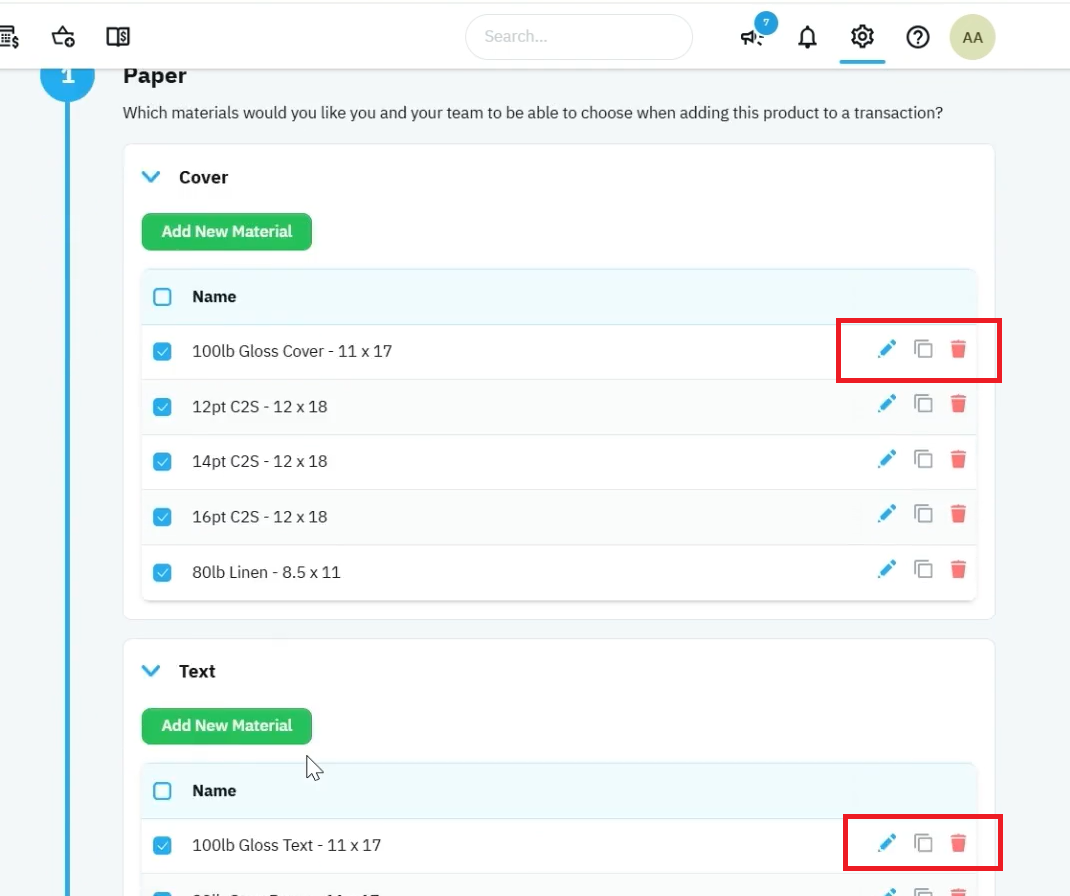
- Locate Section 1 – Papers.
- Add all paper stocks available for production.
- Include any desired:
- Cover Stocks
- Text Stocks
- Specialty Papers
- Save your paper options.
There is no limit to the number of paper options that can be added.
Step 3 – Configure Folding Options
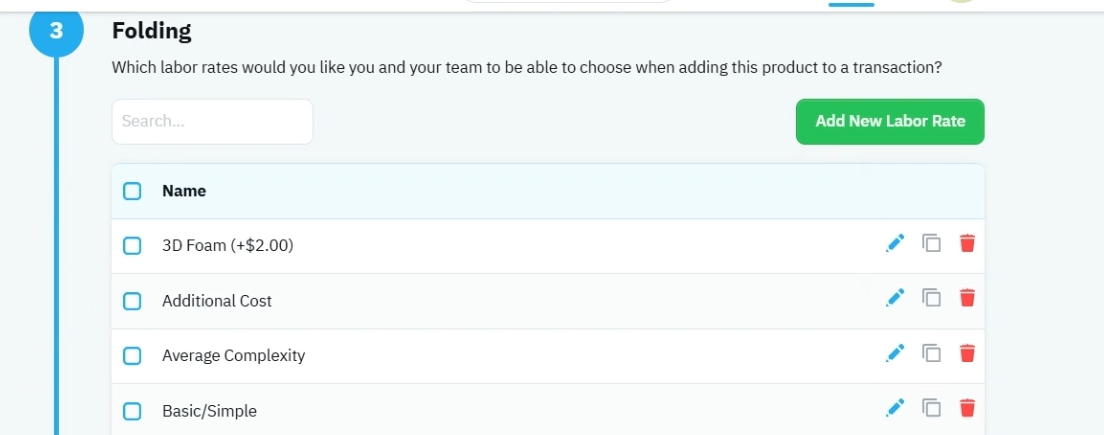
- Locate the Folding section.
- Add your available folding services.
- Enter the labor rates associated with each fold type.
- Save your changes.
Common examples may include:
- Half Fold
- Tri-Fold
- Z-Fold
- Gate Fold
These options will become available during quoting.
Step 4 – Configure Finishing Options
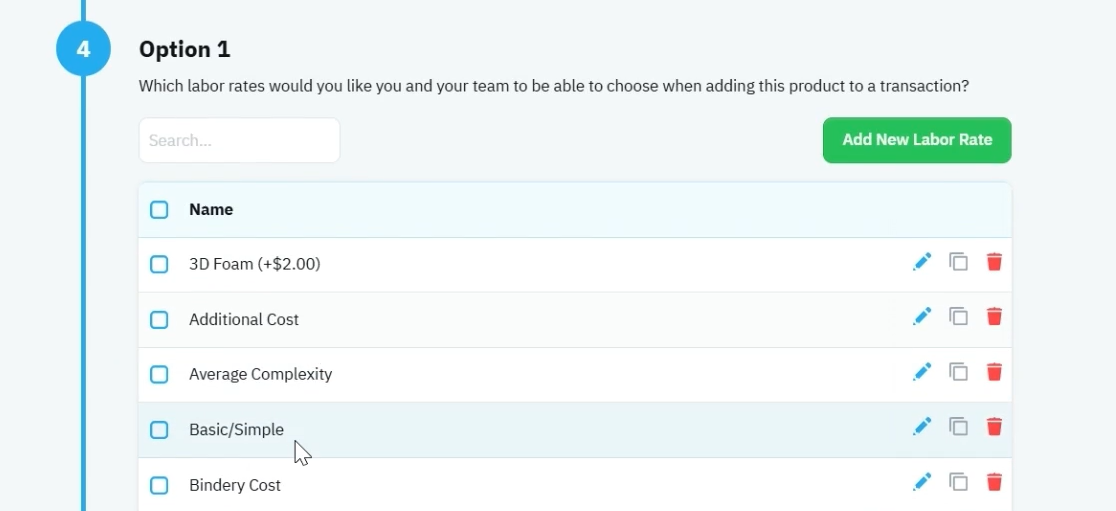
- Locate Option 1, Option 2, and Option 3 sections.
- Add finishing services that may be included in custom print jobs.
- Enter the pricing or labor associated with each service.
Examples include:
- Padding
- Scoring
- Stapling
- Perforating
- Additional Finishing Services
The system provides three separate option groups to allow multiple finishing selections during quoting.
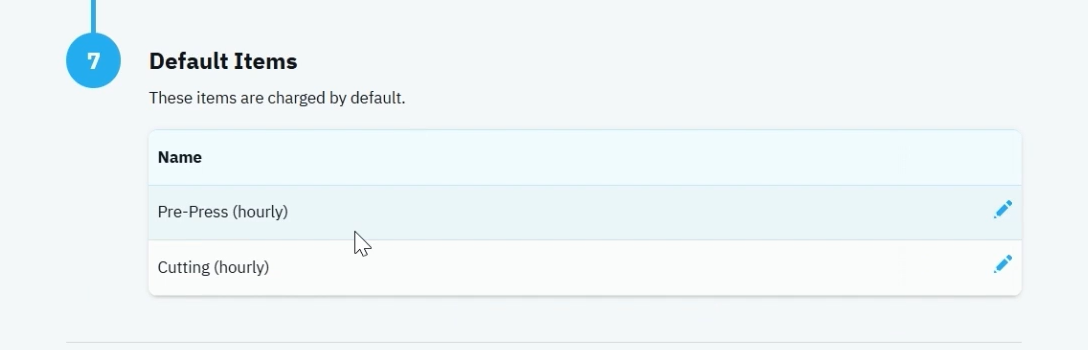
Step 5 – Configure Default Labor Items
- Locate the Default Items section.
- Review the existing labor charges.
- Configure items such as:
- Pre-Press Labor
- Cutting Time
- Setup Charges
- Save your changes.
These default labor values can automatically contribute to pricing calculations.
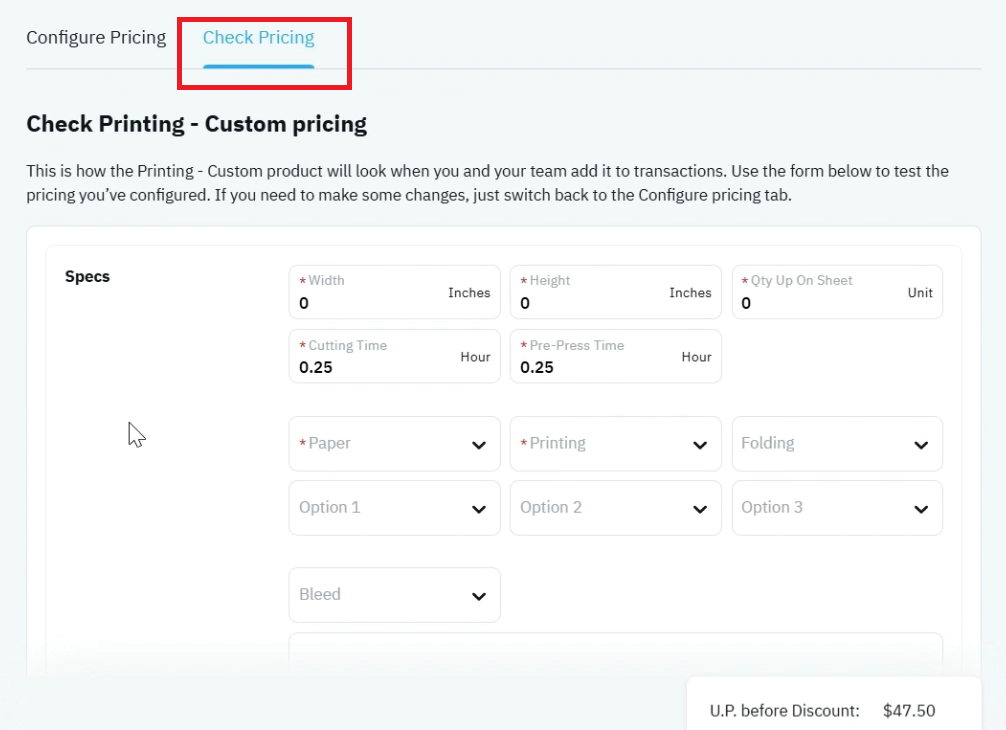
Step 6 – Open the Check Pricing Interface
- Click Check Pricing.
- Review the pricing interface used during quoting.
- Familiarize yourself with the available production variables.
The pricing interface allows users to enter job-specific production requirements before calculating a final price.
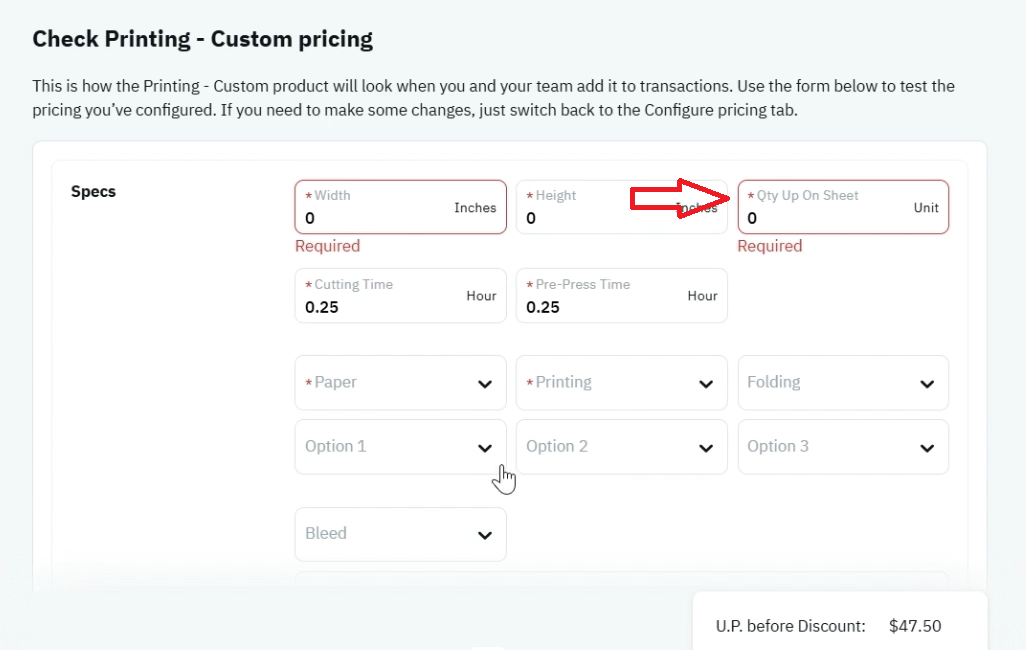
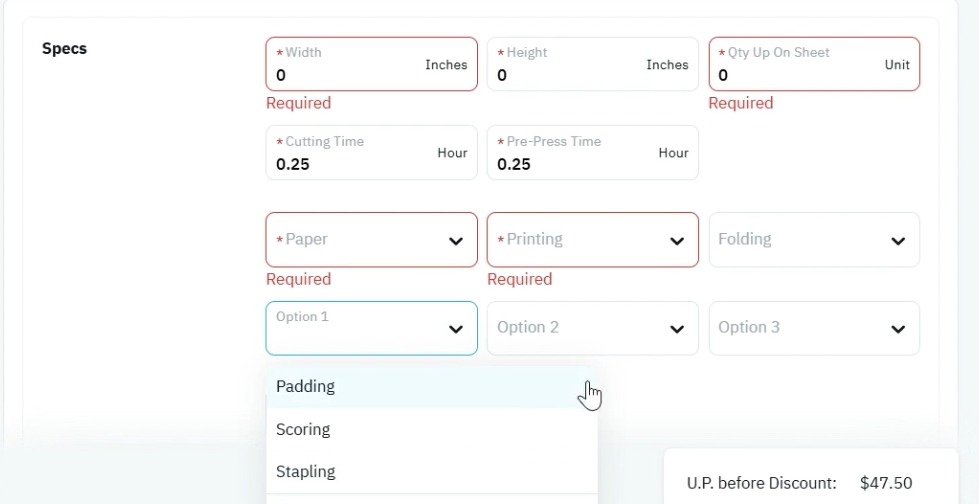
Step 7 – Enter Print Specifications
- Enter the finished print size.
- Specify the Quantity Up value.
- Select the appropriate paper stock.
The Quantity Up value represents how many finished pieces fit onto the parent sheet selected for production.
Your production team should determine the correct quantity-up based on the selected paper size and print dimensions.
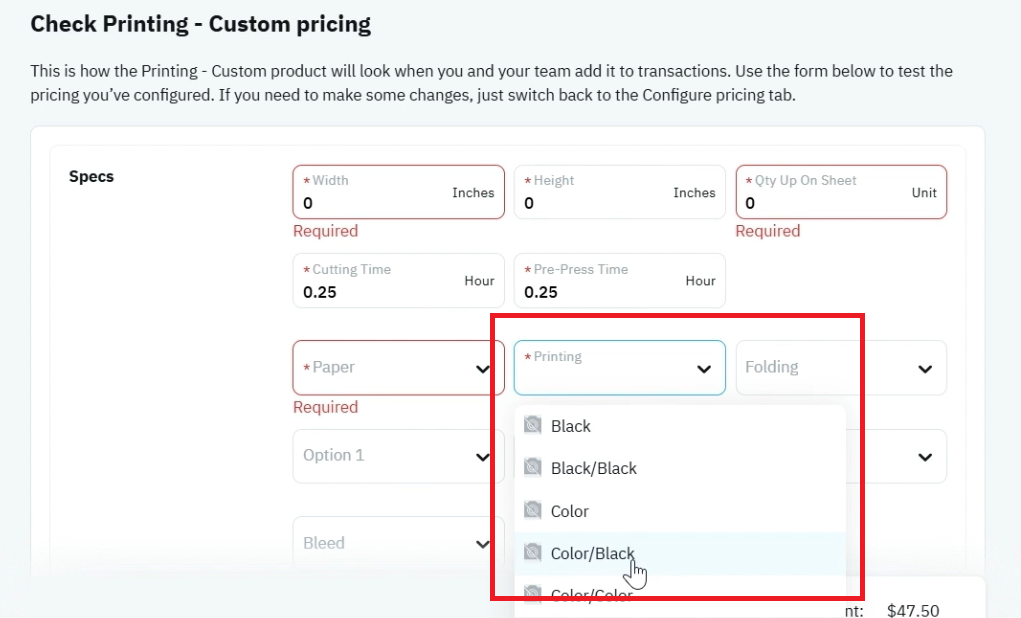
Step 8 – Select Printing Options
- Choose the desired printing method.
- Select the appropriate print configuration.
Examples include:
- Black & White
- Full Color
- Color Front / Black Back
- Full Color Front and Back
The selected print method directly impacts the final price calculation.
Step 9 – Configure Finishing Services
- Select applicable folding services.
- Choose any finishing options from:
- Option 1
- Option 2
- Option 3
- Add bleed requirements if necessary.
- Enter any finishing notes.
Examples:
- Scoring
- Stapling
- Padding
- Custom finishing instructions
These selections allow the quote to reflect the true production requirements.
Step 10 – Review the Pricing Breakdown
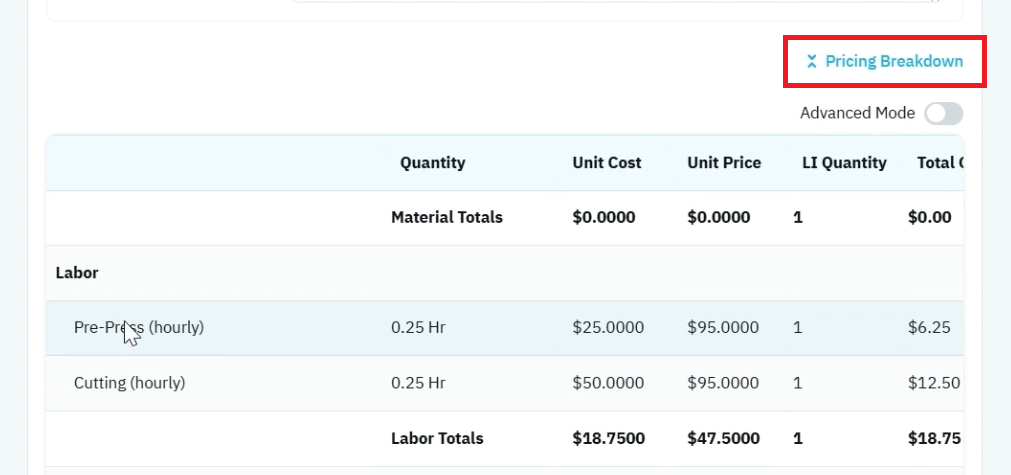
- Open the Pricing Breakdown section.
- Examine each pricing component.
- Verify the included costs.
Common line items include:
- Pre-Press Labor
- Cutting Labor
- Printing Charges
- Paper Costs
- Finishing Costs
This detailed breakdown helps ensure accurate pricing and profitability.
Notes & Tips
🔹 Tip: Use this product when your print jobs require manual production planning rather than automated sheet calculations.
🔹 Tip: Build comprehensive paper and finishing libraries so estimators can create quotes quickly without manual calculations.
🔹 Tip: Review the Pricing Breakdown regularly to verify that labor and finishing costs are being applied correctly.
⚠️ Warning: This product does not automatically determine how jobs fit on a parent sheet. Users must enter the correct Quantity Up value.
⚠️ Warning: Incorrect Quantity Up values can significantly affect pricing accuracy.
⚠️ Warning: Review default Pre-Press and Cutting labor values before quoting to ensure they reflect your actual production costs.
Outcome / Summary
After following these steps, you should be able to:
- Configure the Printing Custom Golden Product.
- Create paper, folding, and finishing option libraries.
- Enter custom production specifications during quoting.
- Apply printing, labor, and finishing costs accurately.
- Understand and manage Quantity Up calculations.
- Review detailed pricing breakdowns for accuracy and profitability.
- Generate accurate custom print quotes without relying on automated BOM layout calculations.

